
When rain puts a halt to outdoor projects and chores, it’s a great time to get creative indoors. Upcycling old tired objects and materials — breathing new life into something you no longer use — is a great way to do that. Upcycling is also thrifty, practical and it can be a great outlet for your imagination.
DIY upcycling projects abound on the internet, but many of them either require special skills such as welding or carpentry, or they involve so many special materials that they become expensive and impractical. Weeding through these many projects, we came up with six easy, low-cost DIY upcycling how-tos that we think are worth the effort.
1. Jazz up a boring picture frame
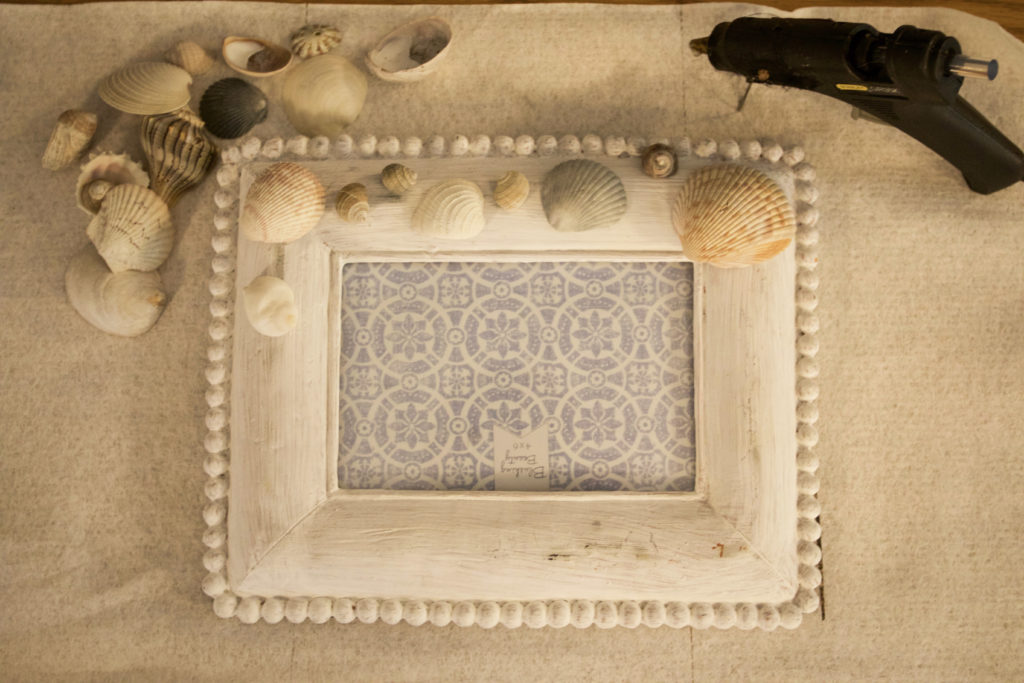
It’s easy to take an old, tired frame and make it into something unique and meaningful. Wooden frames are perfect for painting with acrylic or chalk paint, and if you know what photo you’re going to place inside, you can try painting objects or words that relate to that image, or simply compliment it with certain colors.
For example, if it’s a photo from somewhere you traveled, you could paint the name of the location and the date of your trip. Another popular way of jazzing up a picture frame is by gluing objects to it in interesting patterns, which is a great way to upcycle small objects such as game pieces from an old and incomplete board game, wine corks you’ve collected but don’t know what to do with, or glass pebbles you purchased to line the bottom of a fishbowl years ago.
Hot glue is great for adhering light objects to just about anything, but for heavier trinkets, you may want to use something stronger, like Gorilla Glue.
2. Soup up soup cans
Cans that once contained beans or chicken noodle soup can easily be given a new life with a paintbrush or decorative paper and some glue. They’re the perfect size to hold seedlings or small plants. They also make for great pencil holders. This DIY from The Bonafide Broad, involves upcycling both cans and an old calendar to make holders for office supplies.
3. Piece together a bird feeder
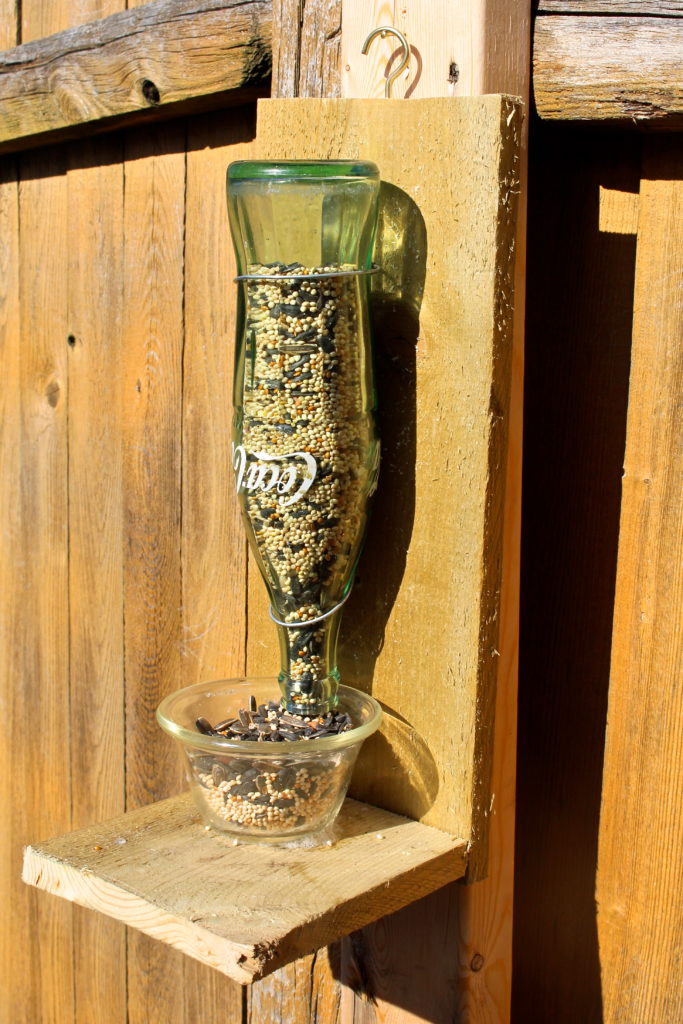
One way to display your creativity to your neighbors is by upcycling common household objects into a birdfeeder. There are several DIY bird feeder designs out there on the internet, some more practical than others.
Remember, if you live in a rainy area, you’ll want to create a feeder that protects the seeds from water, which will cause them to mold. You’ll also want your design to include a place where birds can easily perch.
To learn how to make a bird feeder out of a vintage glass soda bottle, check out this Bangor Daily News tutorial. The project also upcycles a small dish, a short piece of wire and a scrap piece of a two-by-four board. It also requires two nails, glue and a metal hook.
4. Build a quirky succulent planter
Because succulent plants are compact and don’t require much water, they can easily be fit into a wide variety of containers. This has led to a delightful degree of madness in the crafting world. Many of these planters are made out of upcycled objects, including old coffee mugs, hollow plastic figurines and toy dump trucks.
Tea cups are especially popular as succulent planters. Vicky Myers Creations brings this concept to the next level in a tutorial of how to make a three-tiered succulent planter out of a saucer, tea pot and tea cup. And it’s really not as hard as it looks.
5. Transform old mason jars
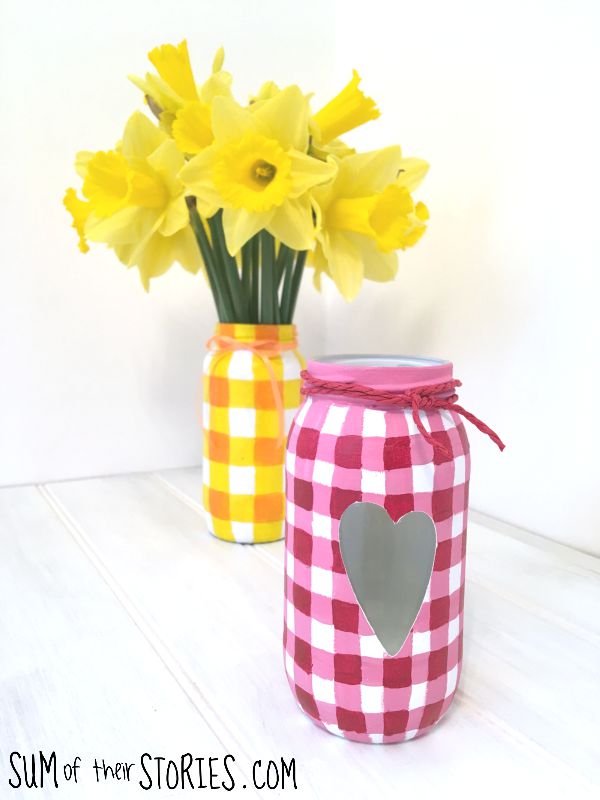
Is your cupboard a little too crowded with canning jars? You’re not alone. To solve this problem, crafty people all around the world have come up with a slew of DIY projects for decorating and repurposing glass jars. Many of these designs include the use of chalk paint, which is a popular material for many upcycling projects. For example, the craft blog The Sum of Their Stories, offers a tutorial on how to use chalk paint, as well as furniture paint, to transform plain glass jars into pretty gingham patterned vases. The end product is a farmhouse-style container that’d be great for holding wildflowers or kitchen utensils.
6. Make magazine art
Old mail is a common component of household clutter, especially old magazines. So why not put them to use? Thick, glossy magazine pages, covered with colorful photos and text are great for creating artwork. Many DIY projects with magazines involve tightly rolling pages to create long pipes or coiled circles. These pipes or circles can then be adhered to a surface to create 3D art.
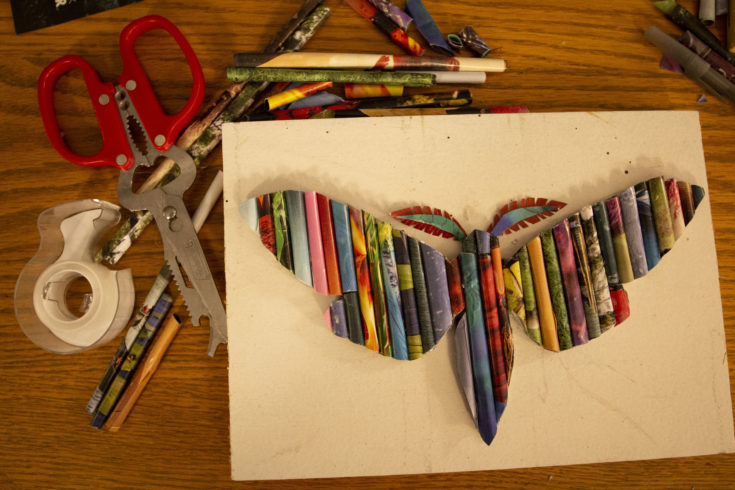
How to create rolled magazine silhouette art
Thick, glossy magazine pages, covered with colorful photos and text are great for creating artwork.
Materials
- At least one magazine
- Scissors (sharp, high-quality scissors are recommended)
- Hot glue gun
- Hot glue sticks (at least two)
- Clear tape
- A piece of computer paper or cardboard of the same size
- A canvas, wooden board or another surface to adhere your art to. This must be at least as large as the computer paper.
- Hardware or adhesives suitable for hanging your art on the wall
Optional:
- A computer and printer
- A tiny dowel or paint brush to roll the magazine pages around
- Retractable utility knife-box cutter
Instructions
- Create the silhouette on a piece of paper by either drawing it or printing an outline from the internet. Think simple. Shapes like hearts, stars and moons are ideal, but you can choose more detailed silhouettes, such as a butterfly or peace sign. Just make sure the silhouette is recognizable, and keep in mind that small details -- such as butterfly antennas -- cannot be filled in with rolled up magazines. You will have to get creative with those small details by either filling them in with cut magazine pieces or using other materials.
- Leaf through your magazines and cut out especially colorful pages or parts of pages.
- Tightly roll each page (or part of a page) into a long tube and wrap it with clear tape in several places so it doesn’t unravel. The tubes do not need to be the same in length or thickness. Keep in mind that whatever color and pattern is at the opposite end if the page from where you start rolling will be what is displayed on the outside of your tube. It can be easier to roll the paper around a tiny dowel or the handle of a small paintbrush (which is removed after).
- Cut out the paper silhouette.
- Use hot glue to stack the magazine tubes onto the silhouette. Allow the tubes to run over the edges.
- Let the glue dry, then turn the silhouette over and carefully cut through the magazine tubes with sharp scissors or a retractable utility knife where they overlap around the edges of the silhouette. In the process, some tubes may break away because of the pressure it takes to cut through the rolled magazine paper. You can either glue the tubes back down and try again or you can measure and cut the tube before gluing it onto the silhouette.
- Glue the silhouette onto a canvas, board or another background. Add art hanging hardware (or adhesives) to the back, and it’s ready to hang on the wall.