
I hoard leftovers. My refrigerator is filled with containers of food from meals gone by that I reheat, snack on or mix and match during the week. Beeswax food wraps provide a reusable, eco-friendly alternative to plastic wrap for all my meal storage needs.
Beeswax wrap is cloth, usually cotton, that is coated in melted beeswax, occasionally along with other ingredients like pine resin and jojoba oil. The coating makes the fabric tacky. With a little bit of heat — say, from your palms pressing down on it — beeswax food wraps cling to various surfaces, like the rims of containers, around loose produce or to even to itself.
Like plastic wrap, beeswax wrap will keep food fresh. Unlike plastic wrap, though, beeswax is washable (in cool water with gentle soap) and reusable.
The most well-known commercially-sold beeswax food wrap is probably Vermont-based Beeswrap, which was founded in 2012. But beeswax food wrap actually has a rich and storied history that stretches back to the seventh century. Ancient Egyptians raised bees in hives and added beeswax to cloths in order to preserve food.
In nature, beeswax caps honeycombs, and bees tunnel through the wax in the winter to reach their honey stores. Beekeepers have to slice off the wax to reach honey during harvest. Instead of discarding beeswax, savvy beekeepers sell it to be used for candles, moisturizers, lip balms and the like.
Some vegans and animal rights activists do not use beeswax (and honey, for that matter) because of concerns that over-extraction from hives leaves bees unprepared for the winter and more susceptible to disease. Sustainable honeybee management practices ease the impact of collection on hives. Still, the controversy about whether beekeeping hurts bees is still buzzing.
When it comes to sustainability, beeswax food wrap kills two birds with one wrap by reducing plastic use and food waste. According to the Ellen McArthur Foundation, 78 million tons of plastic were produced in 2013, 40 percent of which ended up in landfills. Meanwhile, the Food and Agriculture Organization of the United Nations estimates that roughly one-third of the food produced in the world for human consumption every year — approximately 1.3 billion tons — is lost or wasted. What’s more, 40 percent of that food waste is generated at home instead of in restaurants, grocery stores or farms.
I have been happily using Beeswrap for years, but it costs about $18 for a three-pack. Plus, you have to replace them every year or so. At the rate that I use them (and the rate that I accidentally wash them with water that is too hot and melt off the wax), I figured, why not make beeswax food wraps for myself?
Learning to try
I chose to follow instructions from Good Housekeeping, which seemed simple and did not use expensive add-ins like pine resin and jojoba oil. Some DIY bloggers and crafters claim that these ingredients are essential to the long-term viability of beeswax food wraps, but I wanted to see how simply and cheaply I could conceivably make them before investing in fancy ingredients.
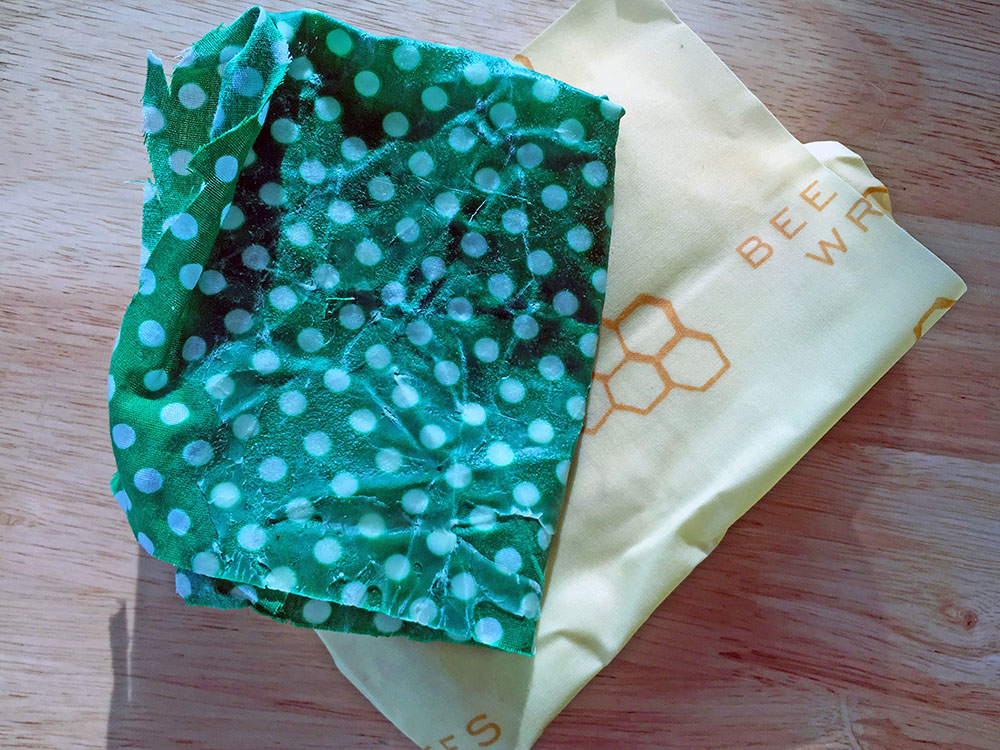
I was most excited to pick out my fabric. To boost the sustainability bonafides of my beeswax food wrap (should I call them Sam’s Savers™?), I headed to the thrift store to peruse through the scrap fabric on sale. I chose a green and white polka dot pattern, though I was tempted by a lavender fabric printed with sleepy owls.
The beeswax was the most difficult item on my shopping list to find. Obviously, it can easily be purchased online, but I prefer to buy locally when I can. After searching a few stores, I finally found a block of beeswax in the candlemaking section of the craft store. If I had my druthers, I would have waited until I could purchase a hunk beeswax from a local beekeeper, but duty (and my column’s deadline) called.

A trying experience
Let’s just get this out of the way: I struggle to cut with scissors. As a collage-crazed, left-handed three-year-old, I taught myself how to cut with a pair of bright blue (right-handed) craft scissors. I am a poor autodidact, and I was never able to course-correct.
So, cutting an even rectangle for my beeswax food wrap was a little more challenging for me than it would be for most readers. Don’t worry, I eventually smoothed out the jagged edges with some careful snipping. Even if you aren’t challenged with scissors, I would suggest penciling out a rectangle that is slightly smaller than the baking sheet you plan to use instead of free-handing it.
Another word to the wise: grating beeswax is hard. Beeswax is at once malleable but unwieldy, slippery but stony. I thought for a second that I had ruined my cheesegrater, but the beeswax actually came off easily with hot water. Yet another reminder to always, always wash your beeswax food wraps in cool water.
The instructions called for beeswax pastilles, which are sold in pellet form. I could not find any at my local craft store but I read that you could achieve the same effect by grating a whole block. After nearly grating my fingertips more times than I am proud to admit, I probably would try a little harder to find those pastilles, or even cave and buy them online.
The rest of the process, though, was fairly straightforward and seamless. Once the materials were prepared, I was surprised how quickly my beeswax food wraps came together, and how much it worked just like the Beeswrap I had come to know and love.
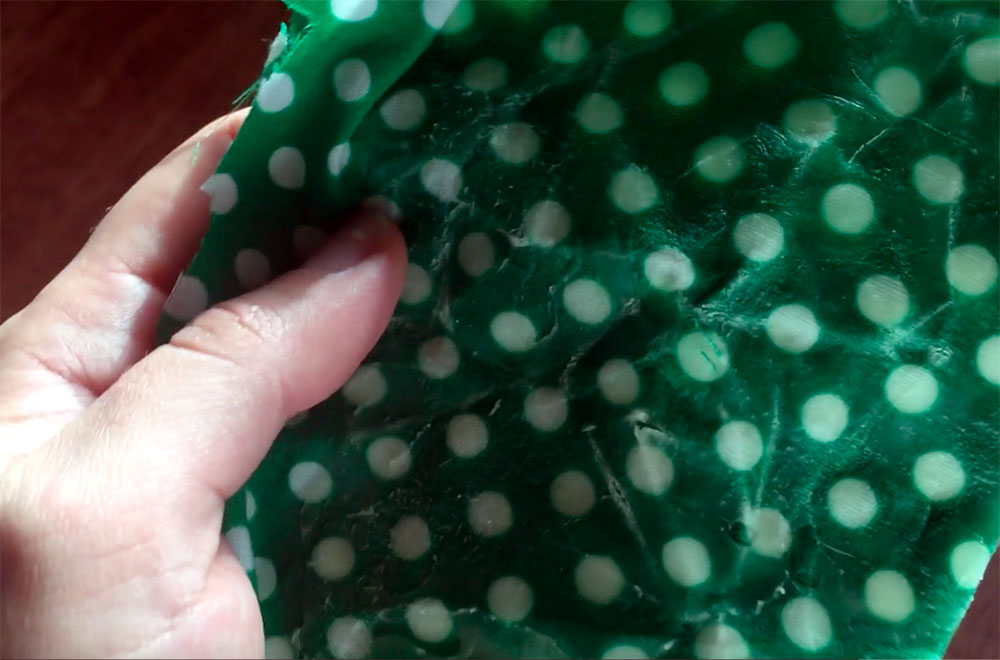
Admittedly, my beeswax food wrap cracked a little bit after I used it a few times, but I have been able to use it since without pieces of beeswax flaking off (yet, at least). It may not last as long as Beeswrap, but Sam’s Savers™ will work for now.
My tried-and-true takeaways
Whether you are dipping your toes into sustainability or looking for ways to make your green habits cost a little less green, making your own beeswax food wraps is fun, easy and enjoyable. I’ll admit, the added ingredients like pine resin and jojoba oil probably make the fabric a little more flexible and durable, so they may be worth the extra investment long-term.
Still, DIY beeswax food wraps are cost-effective: I paid a grand total of about $10 for all my materials, and the swath of fabric I purchased was large enough to make about a dozen wraps of different sizes. The added element of self-expression in choosing my own fabric made it even more enjoyable and worthwhile to me. Plus, personalized Sam’s Savers™ (or whatever pithy name you come up with for your own beeswax food wraps) would make great homemade gifts to secretly coerce friends into being more sustainable.
I have found beeswax here in Bangor at the Natural Living Center for $6.79 for 4 ounces. It originated in Orrington at Z’s Beez. I also purchased a 1 lb block for $13.79 at Tiller and Rye in Brewer. It originated at Aroostook Valley Honey Farm in Fort Fairfield, Maine. Thank you for the article. I have researched making these wraps, and will be purchasing the resin and using Jojoba in mine as my research seems to indicate that this makes them bendy and sealable and long-lasting. Glad to hear that just the beeswax is adequate, though.